Introduction
Features
Interface
The First Step...
Mass Tagging
Tokens to Tags
Filtering out the good
Applying the changes
Reorganising the files
Deleting Duplicates
Online features
Renaming Files
Conclusion
Interface
When you first open the Godfather, the reaction is a mixture of awe and shock. It looks very professional
but it also looks very very confusing. And it is, otherwise this guide wouldn't be here. So the first thing
I'm going to do is explain the interface, and what goes where.
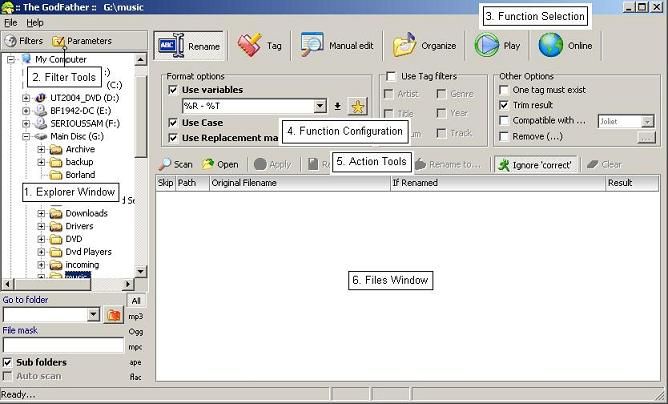
1. The explorer window selects the folder you're working with. This
means that all your music should be in one folder or subfolders of that
one folder. You can have other files in here too, but be aware that if you
select an entire drive here you could also end up inadvertently re-orgainising
game and program sounds too, so this isn't recommended. Generally you should
leave the sub-folders box ticked, unless you have all your music in the
same folder.
2. The filter tools, which we'll be coming to later in the guide.
3. The function selection bar which is pretty self-explanatory, selects what you want to do.
4. The function configuration panel, which is quite confusing. This is where the power of the Godfather lies,
this is where you specify how you want things done.
5. The action tools are what you use to actually implement the changes with in the Godfather. It's where
things happen. Hit the "scan" button now.
6. The file window contains a list of the files you are working with.
Since you hit the scan button this should have been filled with a table
containing rows of various colours. This is called the file grid.
The colours represent the different types of files, and how well tagged
they are. To find out more, go to the menu at the very top left of the screen
and select File -> Options and click on the "Colors" tab. This
lets you edit the colours in the grid, and explains what means what.
The first step to organization
Choose "org anise" from the function selection bar and from the new bar below select "Physically Restructure". Now hit Scan again. After a minute, a tree should appear in the file window. There should be two parts to this window, one that has the name of your music folder and contains folders called A, B etc. Then there's a second part below this called "Missing tags". If your music collection is anything like mine was, when you hit the + icon beside this, you should get a huge list of files. All of these files are not ready to be sorted, they need to be tagged first. And it's here where the fun begins.
|
|